Trail Navigation 101 – How To Use A Map And A Compass
The advent of mobile navigation devices such as GPS and cell-phone applications has led to a fairly common disregard for the old-school, traditional use of map and compass. Like any electronic device, however, navigation devices have their drawbacks and limitations and are susceptible to a host of undesirable variables such as breakage, power failure, loss of signal or simple malfunctioning. Whether you are a technophile or not, knowing how to use a map and compass (and carrying them with you on the trail) is something everyone traveling in the backcountry should learn. Below we’re going to take you through the basics, first looking at the features of a map and compass and then their application out in the field. Our hopes is that these skills will be used for navigation scenarios versus survival, but nonetheless they are pertinent for those spending lots of time in the backcountry.

1) Get to Know Your Kit

THE COMPASS
- Housing (also known as ‘rotating bezel’ or ‘azimuth ring’) – this is the rotating circle on the top of your compass, which is marked with the four cardinal points (north, east, south, and west) and 2 degree graduations all the way around the 360 degrees of the circle.
- Direction of Travel/Orienting Arrow – the (usually) red arrow at the top of your compass’s base plate.
- Magnetic Needle Arrow – the moving needle inside the compass housing, which is usually red at the north end and white at the south end. This allows you to find the cardinal points and orient yourself and your map at any time.
- Base Plate – the clear bottom of your compass,marked with a ruler (or maybe USGS map scales), an index line (the small line below the direction of travel arrow where you read bearings), and the direction of travel arrow.
THE MAP

- Scale – maps come in a variety of sizes and scales, but the most common scales are 1:25000, 1:40000 and 1:50000. The scale of your map lets you know ratio of the terrain represented in the map to the real-world terrain. In a scale of 1:50000, for example, this means that 1 centimeter on the map equates to 50,000 centimeters (or 500 meters) on the ground.
- Contours – these are the lines on your map which show the form of the land and its steepness. The closer they are together, the steeper the terrain; the wider apart, the flatter – useful to know if you are heading off-trail! Contour features are particularly useful because they can be identified on the ground even when covered in snow and can help you locate knolls and hills (represented by ring contours), saddles or cols, gentle slopes, steep slopes, flat ground (when absent), valleys and ridges.
- Grid References – the horizontal and vertical lines printed on any map help us find an exact location and can come in particularly handy in setting up ‘trig-points’ (points you intend to pass on your route) or, in the case of an emergency, for providing your exact whereabouts to the emergency services. The vertical lines (called ‘eastings’) and the horizontal lines (called ‘northings’) are numbered from 00 to 99 in 100km blocks. The blocks themselves are identified by letters which can be found in the key to the map, usually on the front cover. When taking a grid reference, always be sure to read the eastings first and then the northings. For further accuracy, use the small ruler on the top or side of your compass to measure the increments between the easting and northing grid lines.
2) Setting the Map
Setting the map means placing or holding your map so that its features correspond to those in the surrounding terrain. In good weather and visibility, this can be done by eye. In poor visibility you can set the map with the aid of your compass, using the magnetic needle to find north and lining up north on the terrain with north on the map
3) Reading a Compass Bearing
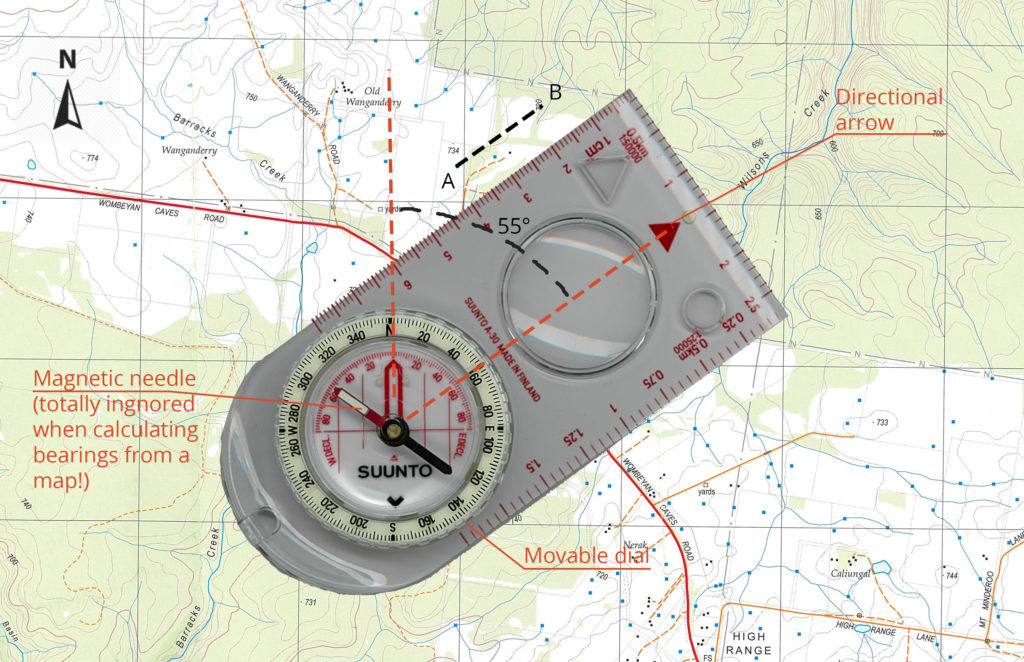
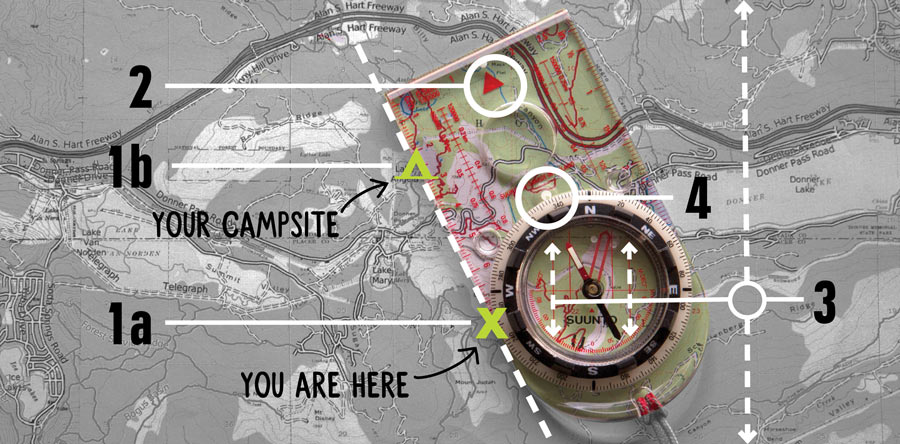
First, roughly estimate by eye the expected bearing to avoid lining up the compass in the wrong direction and taking a bearing that is out by 180 degrees. Place the compass on the map with the ‘direction of travel’ arrow pointing in the direction you want to go and then line up the edge of the baseplate with your location and the feature to which you wish to navigate. You can also, if need be, use the lines running parallel to the edge of the baseplate to make it easier to see the detail on the map.
With the two points accurately lined up, hold down the baseplate on the map and rotate the compass housing until the north arrow in the compass housing points to north on the map. At this point, make sure that the housing lines are parallel to the eastings (the grid lines pointing north).
Now that we have taken the grid bearing (this can be read in the cursor in line with the direction of travel arrow) we can make a quick adjustment for magnetic declination (check this for your area online – the variations from one location to another can be huge!) and get moving.
4) Traveling on Your Bearing
Holding your compass in front of you, turn on the spot until the north end (usually red) of the magnetic needle aligns with the north arrow in the compass housing. The direction of travel arrow now shows you which way to go.
The best way to follow your bearing is to pick off interval targets or features along the direction of travel and use these as ‘stages’. While you can simply walk and glance down at the compass as you go, this is a difficult skill and the cause of many a trip and stumble! As you walk, keep an eye out for notable features on the map or in the trail and ‘tick-off’ or cross-check them to make sure you are on track.
- Finding Your Whereabouts With Triangulation
‘Triangulation’ is very useful means of finding exactly where you are on a map. Even though utilizing this method is tricky in low-visibility, in all but a complete white-out there will usually be some visible features providing the reference points required to triangulate with three bearings. Here’s how it’s done:
- Find a notable feature in the terrain that can be identified on your map, such as a boulder, peak, ridge, gully, saddle or the edge of a forest.
- Holding the compass flat in front of you, point the direction of travel arrow directly at the feature and rotate the housing until the magnetic needle is aligned with the orienting arrow.
- Read the bearing from the index line at the top of the housing, below the orienting/direction of travel arrow.
- Place your compass on the map with one straight edge and with a pencil, draw a line down the edge of the compass from the feature to the bottom of the compass.
- Repeat the process with a second feature and then a third, creating a triangle (your location) where the lines intersect. In many cases, the triangle formed by these three lines will be fairly large. If this is the case, start the process over until you can place yourself within a twenty or thirty-meter radius.
Map-reading and compass use are easily-acquired skills that can prove to be incredibly useful while traveling in the backcountry. Take the time to learn the specifics of your map and compass prior to venturing out in low visibility or on difficult terrain and take every opportunity to increase your proficiency while out in the field or on the trail, even in clear weather. You never know when your navigation device is going to let you down, but by learning these skills you give yourself the ability to navigate safely and confidently in any terrain, regardless of the weather!


No Comment